PhotobucketPhotobucketPhotobucketPhotobucketPhotobucketPhotobucket
Showing posts with label diy. Show all posts

Monday, November 25, 2013

Weekendlies: More November to Remember

1. Gold & Black. Visions coming to life.
2. DIY gone very, very right. 
3. Heater Sunday. Maybe. 
4. Half setting up church. Half eating breakfast.
5. Carrying those heaters is no joke.
6. Hope kids, I think they like me.
7. Hopefully this one does too. 
8. I have a date with this guy Thursday morning.
9. Someone wants my butternut squash soup. 

Wednesday, November 30, 2011

Pintertest Kitchen: The Crayola Canvas

COLOR.
I heart color.

I used to be really big into black and white and gray.
Big, bold, silhouette prints.
I still am.

But these days I am fiending for color.

I saw the melty crayon canvas on Pinterest a while back when I first found out about Pinterest,
 and then saw that Meg did it.

So I pinned her project - right onto my color board.


So I made a quick trip to Michael's 
(which BT-dubbs, um, first Sunday after Thanksgiving, that place is BANANAS)
But I found what I needed.
Crayons.
And a Canvas.
Its a good thing I took a minute to think this through because I almost only bought one 64 pack.
It is 4 crayons deep.
Four packs across the canvas did not fit.
6 did.
Or two and a half 96 packs across. 
Yeah, that probably doesn't make sense.
But if you ever do this project, it will.

So one 96 pack would be more than enough.
Okay, vague math lesson over.

Super easy project. 
While my glue gun heated, I organized my crayons.

Once they were in order (which was the hardest part)
I started gluing.
Which was the easiest and funnest part.

Also, I have a very powerful blow dryer.
It started splattering like crazy.
Enter scrap paper below the canvas, and all over the floor.
Kind of torn between putting the blow dryer close to the canvas where it would get the most heat
but also the most splatter,
or keeping it farther back, but not seeing as much crayon meltiness. 
I went with the former.
Splatter away.
Which you KNOW what that means.


Blow dryer covered in wax?
Should have expected that. 
Oh well.


In the end, I think it turned out FABULOUSLY.
And there is only a little bit of splattered wax on my cabinets and carpet.
But it totally blends in with the hot glue I dripped on the carpet last week.


Linking up this creation with Jessica's Pintertest Kitchen, you should too
(linky party open all month):


Wednesday, November 16, 2011

Tis The Season for Christmas Bunting

I'll be the first to admit it.
I am high maintenance.
Which means, there is no room for other high maintenance things in my life.
Especially crafts.
I stick to the low maintenance stuff.
Like spray painting (really, it is low maintenance).

I look at all your cute buntings on blogs and pinterest.
And I get way jealous.
Busting out the sewing machine.
And iron.
And bobbins.
It's too much.

But scissors and unused construction paper?
BAM.
DONE.

Last month I copy-catted a Halloween paper bunting from Pinterest.
I copied each triangle and details down to a T.
I'm a copier.
Not a creator.
Give me a recipe and I can whip it up.
Give me play by play instructions and I'm in heaven.
But leave me in a room of craft supplies and I struggle.


But, with a little leftover inspiration from Halloween I created my own Paper Christmas Bunting.
Yep.
From my own imagination.

I sketched up exactly what I wanted to make.


And then I copied my own handiwork.

I even went a little CRAZY and made up one more that I hadn't sketched out.
I know.
WILD.

Last year I ended my Christmas decoration hiatus.
Look out Christmas 2011. I am coming for you.
Starting with a paper bunting.
I think it turned out AWESOME.


And in case you want to copycat, my cute Christmas characters are ready for their close ups.


The elf is by far my favorite.
What's yours?

Best part? This cost me a bag of googly eyes.
Everything else I had in my abandoned scrapbook tote.
And cotton balls from my bathroom.

I know it's a bit early for Christmas decor. But I couldn't help myself.
And I wanted to share some Christmas Happy!
In enough time for you to get your own Christmas Happy on!


Did you, or will you give to the Wounded Warrior Project this week? Please hop over here and let me know - As a part of the Happy Day Project I'm giving away a few goodies that support WWP - just leave a comment and you are entered to win!


Thirty Hand Made Days

Monday, July 11, 2011

Thriftin', and Sprayin', and Wishin, and Hopin'

**If you found this link via facebook, I'd love to know how! Please leave me a comment and let me know where you found A Cuppa Kim!! Thanks so much!!**

So, the long weekend meant there was time for a little bit of crafty adventure-y goodness...

On Saturday, Betsy, Laura and I met up, and decided to do a little shopping.
Betsy wanted to get some frames to spraypaint at a local, giant, thrift store, Savers.
And I have been dying to scope this Savers business out for a long time.

Betsy scored BIG TIME with a ton of awesome frames, with plenty of texture and character that she has been spraying away.

I was in the market for just about anything that would be fun to paint.
I am really, REALLY happy with my purchases...
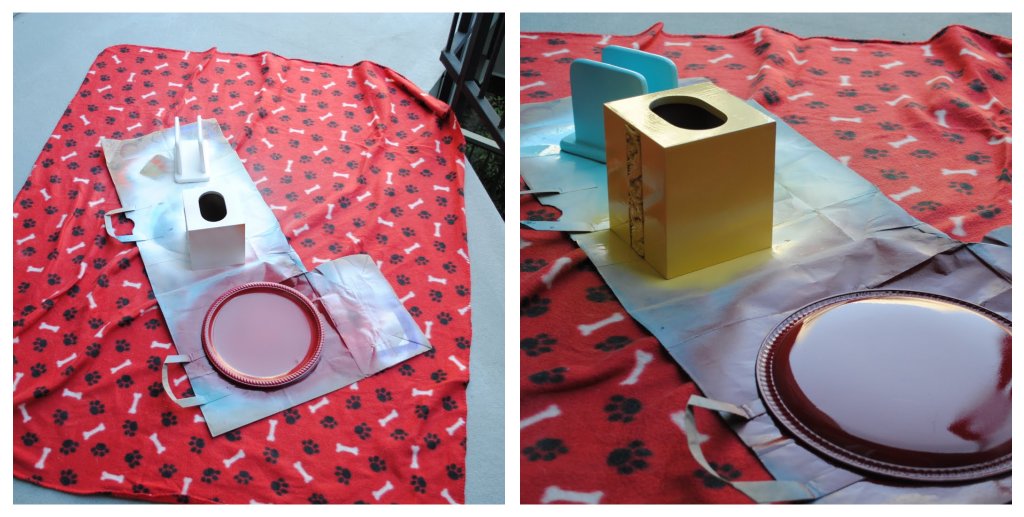
I found this lovely green carafe (not for spraypainting, just for awesomeness), a gold lame tissue box, a napkin holder, and my personal favorite find a flour/sugar/coffee/tea cannister set.

I unscrewed the brass letters, and wiped down all of the boxes, and removed the plastic inserts (and washed those with plenty of hot soapy water), and let everything dry. 

Meanwhile, I got to work on the smaller items...
Also, I have a better method for keeping spraypaint residue from covering my walkway...it's not cute, but it's functional.


And yes, I basically changed the tissue holder from gold, to golden yellow. Not a huge change...but still way cuter. And also, was inspired by Andrea's fabulous bathroom remodel.
The napkin holder, I sprayed aqua...and then Monday decided I didn't love it...so I sprayed it dark gray. The aqua paint is a satin finish, the gray is glossy. I totally noticed a huge difference here...the glossy makes all the difference in the world. If only aqua came in glossy...that would solve a LOT of my problems...


Much better.

So...back to the cannisters...
I cleaned.
I primed.
I painted.

I forgot a side...


Whoops.

I let everything dry.
And then next day, I went out to finish that one last side...
And add a glossy coat to the rest of the boxes.

I sprayed the glossy coating...went inside to let everything dry...and came back out to find this disaster:


Um, WHAT?!?!

This box got it the worst. But almost every single box had this wrinkly, peely effect. My dad called it "orange peeling".

I was SO, SO, SO sad.

Prior to the glossy coat, everything was hunky-dory.

Post-glossy, not so hunky.

But thankfully, on my latest trip to the H-Dizz (which BTW, we are starting to get along a little better....although the parking lot is one half-step up from the Costco parking lot of doom...not my favorite), Betsy encouraged me to get some sandpaper.  So, me and my tender little hands, got to sanding. We sanded away all of the peely, bubbly, ugliness. Well as much as could be.

And I reprimed.
And repainted.

And um, by the way...here is my ever growing collection. Thankfully, I have found a secure hiding place for my paraphernalia.  Fun, right?


So, on the second, sanded down, carefully reprimed coat...things were back to their hunky selves.

Everything dried. Overnight. Actually, over several nights.

So I went for it.

I glossed.

And yep, orange peels.

RUDE glossy coat, RUDE.


You win, Rustoleum. This time.

Rustoleum....are you out there? You stopped by last time and said hello...but any words of wisdom on this horrific tragedy? Why does the glossy spray exist if it counteracts with your other sprays? I am perplexed. And so is one of my readers who had the same thing happen!

Anyway...thankfully, perfectionism is not one of my spiritual gifts. So, I just sucked it up. And decided my poor tender thumbs were not up to the sanding process again. So, I screwed the labels back on their boxes and admitted defeat called it a victory.


Flour and Coffee made out alright. Sugar and Tea...well, they aren't so sweet.

I used Dark Gray - GLOSSY - for the letters. And I think it's by far my favorite color. I love the way everything turns out. SUPER glossy looking. So pretty.

Also, I already had a flour and sugar canister set - just regular stainless steel types - but, since I basically run an amateur bakery out of my kitchen, I have five kinds of flour (all-purpose, cake, self-rising, whole wheat bread, and white bread) and three kinds of sugar (granulated, brown, and powdered) - I am using these sets for different than my standard all-purpose/granulated combo. Whole wheat bread flour and powdered sugar made the cut!


For their final placement, I rearranged my sink windowsill display.  (Because really, in a tiny galley kitchen, real estate is hard to come by).


Mission complete.

For now.

Linking up over here...


Tuesday, June 14, 2011

The Spraypaint Chronicles


Is it Spraypaint?
Or
Spray Paint?

One word?
Or
Two?

Okay...just rolling with it.

Apparently, Julie is the spraypaint expert.
A while back, she posted about making THESE.
And I wanted to hop on the spraypaint train, SO. BAD.

But to be honest, I was VERY intimidated.
What do I do?
How do I do it?
Do I spray the INSIDE or the OUTSIDE of the jars?

I have seen a handful of blogs where people see something and think "with a little spraypaint that will look AWESOME" - I don't have eyes that work like that.

So I copy.

Thankfully, the girl sent me her tips and tricks.
Rustoleum brand only.
Glossy.
Use a primer.
Spray the outside.

Simple enough, right?

But then, something else happened.
I saw this tray I have and thought - I would love this SO MUCH MORE if it was just spraypainted a solid color.

I have been wanting a tray to use as a base for the centerpieces on my coffee table - and had the perfect tray, but it didn't match.

Until now.


Here is the tray.
It is from Starbucks.
Many, many moons ago.
I have matching mugs.
And coasters.
But I'm kinda over the flowers.
I want teal.


Please note the Trader Joe's bags for ground covering.

Please also note the fact that I did not exactly cover enough ground.

I will be making another stop at Home Depot to pick up some gray spray paint to cover my tracks.

WHOOPS.

HOA, don't fine me.

Please.


Primed! And discovered a glass jar from my peanut butter that would be a wonderful test subject as well!!


Look at all of those fun colors!!
The jar is actually a lime green - it kinda looks yellow here.

And I bought two teal colors - Lagoon and Aqua.
Unfortunately, they only had these two colors in Satin finish instead of gloss.
I went with the darker color, Lagoon.

So pretty, right?


And when I was inside waiting for the paint to dry...I remembered the coasters.
And how, if they were solid colors, I'd like them a whole lot more.

Please note my new entry way table.
I found it via pinterest.
Please note that it matches my spray paint as well. Haha!


So, back outside I went.
Primed.
Sprayed.

Meanwhile, the tray had dried.
Spraypaint dries relatively fast!

And, I think it came together rather nicely!


And the coasters?
I went multi-colored.
And.
I think they are...
Just.
Lovely.


And a full shot of the entry way, coasters, and glass jar...


Linking up over here...

Tuesday, March 15, 2011

Do It Yourself: Painted Headboard - Or have a friend do it for you!

Still working on my post from the past weekend, but in the meantime, here is a throw back project I did in November 2009. I still love it.

**************

I love a good old Do It Yourself project.

But a lot of times I see stuff, and find it way too overwhelming.

But you know what is not overwhelming? 
Having an extremely talented and artistic friend who is willing to take on the adventure with you!

A year ago November, I purchased a new bedding set, and decided it was time to take on the challenge of making a painted headboard that I had seen on Lizzy's Blog.

It was Thanksgiving weekend, and Betsy was home from college.

I invited her over, and she was game for the adventure.

The girl likes anything involving paint.

First up, we picked out paint colors. I went with black and gray.
(exact colors I don't have with me, but I can find out)

I wanted a solid black headboard with a stripe of gray, and an exterior border of black.

I also wanted a swoopy elegant design like Lizzy's.

As Betsy taped. And I directed, we realized that the detail of creating "posts" on the headboard was a bit more than we were capable of.

About 37 different tape configurations later, we went with a basic rectangle.

Simple. Classic. EASY.

Then came the next step - fully taping where we would paint.


Exterior row of tape bordering the entire headboard
2 rows of tape representing the black two tape-width border
1 row of tape representing the gray stripe
1 row of tape to contain the gray stripe

We painted the gray first. Let that dry. 

Meanwhile we painted the interior. 
Then we covered the dry gray stripe with painters tape so we could paint the black around it.


Eventually the whole thing was done, and VOILA, fancy headboard!


I absolutely love the way it turned out.
And it matches my bedding perfectly!


And it really tied together the look of the room - which was inspired by the chandelier painting I hauled back from Ireland. 


Unfortunately, I documented the whole thing using my iPhone - so the pictures didn't turn out super fab. But I think you get the idea!
************************************

MANY, MANY thanks due to Betsy for her kind heart, and free labor! 
Betsy, is headed to Cambodia this summer to love and serve others in the name of Jesus. 

Like I said above, she is extremely talented and creative. If you are so inclined, head over to her Etsy store, It's Etsy By Betsy, and check out some of her amazing work!


All of the money she makes off her sales is going towards her trip overseas. Pretty awesome! 

Love ya, Bets!!!

********