PhotobucketPhotobucketPhotobucketPhotobucketPhotobucketPhotobucket

Monday, February 28, 2011

The Single Lady's Classy Chicken Noodle Soup

Sometimes when I write these posts, songs get in my head...do you know the Chicken Noodle Soup song? I don't know the lyrics except it goes "Chicken Noodle Soup, Chick-ken Noodle Soup". Not really a catchy tune to type out on a blog, but its in my head.

So, when I am sick, there isn't much that I like more than a hot bowl of Chicken Noodle Soup. Well that and a Slurpee. In fact, I even like chicken noodle soup when I am NOT sick. When I was a little kid (and okay, a big kid too) my mom would always make me Campbell's. It is definitely my chicken noodle soup of choice.

But now that I'm a grown up - its time to class things up a bit and make some grown up chicken noodle soup.

With the exception of the fresh veggies thrown in, all of these ingredients are easily kept on hand, for that unforeseen sick day.

Last week, I had a few sick days with some kind of sore throat cough combo. The sore throat is gone, but the cough has been lingering. I definitely needed a little chicken noodle goodness this weekend to keep me going on the road to recovery!

The Single Lady's Classy Chicken Noodle Soup

Here is what you'll need:


  • 2 Boxes of (Low Sodium) Chicken Broth (only one pictured)
  • 1 Can of Chicken (like canned tuna, except chicken)
  • 1/2-1 Container of Mirepoix from Trader Joe's (or Onions, Carrots and Celery chopped up)
  • 8oz (weight) Whole Wheat Noodles (I used Penne, non whole wheat is also fine)
  • Any combination of Salt, Pepper, Garlic Powder, Cayenne Pepper - to taste. (not pictured)

Instructions:
In a big pot, bring the chicken broth to a boil. Throw in all of the other ingredients. And cook until pasta is done to your liking.

Serve in a pretty bowl. With a few crackers, buttered toast, or slice of fresh bread. Get well soon!

Here is what I love about this recipe:

Accessibility: Like I said above, you can keep everything on hand in case of emergency. When the need arises the only thing you'll need to pick up (or have delivered to you, if you are curled up on your couch ruing the day) is the Mirepoix. If you desperate enough, you may even have the onion already on hand. And might be willing to skip the carrots and celery.

Mirepoix: I don't even know how to say this word, but I love that Trader Joe's offers it. Onions that are already chopped? Yes, please. No tears here. And it sounds fancy. I like fancy.

Canned Chicken: I don't really like touching meat. Especially raw meat. I also get nervous cooking meat - I want it to be thoroughly cooked. No salmonella here! Canned chicken solves those two problems for you. Plus, you can keep it in the cabinet, and not have to worry about it going bad, or the time it would take to defrost.


Repeat Offender: This recipe will definitely make you 4 servings of soup (or more, or less depending on how big of a bowl you serve yourself). If you are like me, and don't mind eating the same thing four days in a row, then it you are in luck!

Fanciness: It is a jump from regular old canned soup. It maintains its white-trashiness with the canned chicken, but is still, a good hearty chicken noodle soup. That you cooked yourself on your stove top. If you really want to pump it up, you could put in two cans of chicken. I think that is a bit much for me. But it would definitely make it more of a solid, filling meal. You can also get creative with anything else you might want to add in. Beans? More veggies? Rice? I like my Chicken Soup classic, so I keep it to the basics. But, go ahead and get crazy.

Let's keep it classy ladies! 

Friday, February 25, 2011

Brownie Covered Oreos - Oreos + Girl Scout Cookies = YUM

What do you get when you cross THIS RECIPE with these:

I will show you:
Yep. 

A couple weeks ago, the brownie covered oreo recipe was making the rounds on twitter, and blogs. I emailed it to myself and planned to make. Then, Jessica blessed our church by baking and bringing them one Sunday. 

At about that same time, rumors of Girl Scouts peddling their treats were swirling around town.
And, then a million twenty dollar idea hit me!

Last weekend, I was recovering from the death plague, and despite hitting up a few grocery stores, never crossed paths with the girls in green.


So tonight after work, I stalked tracked down the cookie pushers, and stocked up and got to baking.

And for the record, I used color coordinated sprinkles (matched to the boxes) to know which treat contained which cookie. 


I haven't tried them all (yet), but I love me some Samoas.

You're Welcome,
A former member of Troop #148


Thursday, February 24, 2011

Rose around the Wreath-y

I guess it makes me an official blogger that I made this:


Yep, that is a rosette. Real bloggers make/wear/sell rosettes. There are so many pretty ones out there.  Mine, not so pretty. Lots of glue gun gunk all over it. But, I'm pretty far from a perfectionist, so I continued on my crafting journey.

There were a few "experimental add-ons", in addition to the rosettes - but I wasn't really feeling them. So there may or may not be some glue clumps left in the rosette clusters. But I'm happy with it. Now all I need is one of those over the door wreath hangers (the only option when your front door is metal). 


The best part about this craft is that with the exception of the wreath form (which I got with a 40% off coupon at Michael's - checked the Dollar Tree - they had other foam forms, but no wreaths, boo!) , I had everything else on hand. (Fabric, glue gun, and glue sticks!)


Inspiration and instructions found HERE.

I am definitely going to be lurking the Dollar Tree again to see if any of those wreath forms show up. It would be so fun to make a few more of these!


Edit: Picked up a wreath hanger, and now my door is extra cheery.


Tuesday, February 22, 2011

Bread Machine Banana Bread Gone Rogue

So I was home sick for another day, and after posting this, (and well, eating most of it), I wanted to whip up another loaf...while I loafed.

First I wanted to make a Jam Bread - which is bread with jam IN it. But Googling Jam Bread in a Bread Machine only brought up results for making actual JAM in a bread machine (who knew?).

So I walked away from the computer and into the kitchen and sliced myself a slice of yesterday's bread, where the smell of ripe bananas gave me another idea. What about Bread Machine Banana Bread?

Back to the computer.

More Googling.

Nothing matched what I wanted to make. A lot of them called for fancy settings on a bread machine - and I don't think Home Bakery II, circa 1989 does more than your basic bread cycle. And the real majority of the recipes were for Quick Breads - no yeast, no rising, just mix and bake.

So, what did I do? I went rogue.

Which is a pretty standard for me.

I decided I was going to work off the basic whole wheat bread, and make it my own.

Here is what I gathered:

3 Cups Whole Wheat Bread Flour
1/2 + 1/8 Cup of NonFat Milk
1/2 + 1/8 Cup of Heavy Cream (these were the two dairy products I had on hand - googling also taught me that the fattier your milk, the fluffier your bread - I want fluffy!)
2 Tbsp of Butter, Softened (I happened to use salted, because I bought way too much of it)
1 Tbsp White Sugar
1-2 Tbsp Brown Sugar
1 Tsp Salt
1 Package of Rapid Rising Yeast
1 1/2 Bananas Mashed
1/2 Tsp Almond Extract (Yum)
1/2 Tsp Vanilla Extract (also, Yum)
1/2 Tsp Cinnamon
Dash of Pumpkin Pie Spice (not pictured)


Since I'm going rogue, I kept to the basics - liquids on the bottom:

I started with the wet ingredients on the bottom. The Milk, Cream, Butter, Vanilla & Almond Extracts, and Mashed Banana. I also added the Cinnamon & Pumpkin Pie spice at this point - not exactly sure if they will do anything to the yeast.

You call it an egg masher. I call it a multipurpose tool.


Then on top of the liquid layer I poured the flour, and on top of that the salt, sugars, and finally the yeast.

Home Bakery II does have a "light" setting. So I hit that, better to be safe than sorry.

And hit start.

I checked in on the dough - it seemed sticky (should I have put in more flour? too late anyway). A couple hours later, during the rise cycle I checked on it again.


The bread had risen almost all the way to the top of it's container! This was a first in my breadmaking history! Could it be the heavy cream? Could it be the extra volume of banana? Could it be the extra tablespoon of sugar? Who knows! I went rogue!

After this, I made a bit of a cosmetic error. I poked the top of the dough. I was curious how dense it was. Not very. And the middle caved in a bit. I was so close to the bake cycle that it never came back up and so my loaf has a little dent in the top. But really, it didn't effect anything. Just gave it a little character.


The bread came out super light, super airy, and super fluffy! Mission accomplished! I gently carved a few slices - and I mean gently, the crust is solid, but the insides are super light. 
And brewed myself a pot of Cinnamon Spice Tea for One. And enjoyed the banana bread harvest.


In the end, I think it turned out really nicely. I probably would add even more banana next time. The banana smell was great, and flavor was light. I wouldn't have minded a little more of it. I also wouldn't have poked the dough (whoops). I might have added a bit more of the spices - I was worried about overdoing it. And I love walnuts in my banana bread. Home Bakery II does not appear to have a nut setting. I hear most modern day bread makers do - so if yours does, I would encourage throwing those in. Yum! :) 


Thirty Hand Made Days


Monday, February 21, 2011

Queen of Hearts

My sister brought back gifts from me from her vacation to Chicago, they are the latest additions to my addiction:


I love it all.
Thanks little beast. <3


That last pic is my Sweet Shot for Sweet Shot Tuesday :)
Sweet Shot Day

Friday, February 18, 2011

1989 Called...It Wants It's Bread Machine Back

...or maybe that was my parents.

A couple months ago I jacked my parents' time machine bread machine from the dusty depths of their kitchen. I don't think it's seen the light of day for almost a decade.

I remember when they first got the machine, it was a really big deal. But as a kid, a bread machine is pretty dull. You throw everything in. And then have to wait at LEAST FOUR HOURS until you get to eat anything it makes. And sometimes, you do things on the "extended" thirteen hour cycle. Torture.


Today I came down with some kind of variation of the plague. Recovery requires a lot of doing nothing. My dad sent me home with some Minestrone soup - so I'm good there. But I needed something to go with it. Something breadlike.

You know, like bread.

So, I plugged in the top of the line in 80's breadmaking technology, the Hitachi Home Bakery II, and let IT do the work.


I use the recipe on the machine. The ingredients are simple enough - and they are easy to keep them all on hand.

Milk
Salt
Butter
Bread Flour (I used whole wheat)
Sugar
Yeast


That's it. I put everything in the machine in that order. Liquid on bottom. Dry in the middle. Yeast on top. I read somewhere that the longer until it has contact with the liquid, the better. Maybe that isn't true. But it works.


And then I hit start.

And walked away. And sat on my couch nursing my plague-like symptoms for the next four hours.

I enjoyed a fire. While it rained outside. And a little bit inside too (but that's a different story, for a different day).


And my Schnoodle was extremely concerned about this unfamiliar rumbling machine. She made sure it was safe.


And after the four hours was up - I enjoyed a slice of fresh bread. With butter. And leftover Cherry Preserves from my Cherry Lovie Cakes. And then maybe another slice. ;)


Wednesday, February 16, 2011

The Single Lady's (All the Single Ladies! All the Single Ladies) Meatloaf

So over here at Chez Single Girl, cooking dinner can be quite lame. One of my favorite dinners is Trader Joe's frozen Chicken Enchiladas. They are 330 calories, and a DOLLAR and SIXTY-NINE CENTS.

That is a full meal. At a budget friendly price.

And they are good. Yummm...ok. Must stop thinking about them.

But sometimes, I like to fancy it up a bit. I mean, dining habits of a bachelorette should NOT resemble those of a bachelor. Us ladies can't eat frozen dinners every night, can we? (I won't answer that).

So, I have a few go-to's. Here is the criteria that make a good Single Lady Dinner:
  • Easy. The simpler, the better. I make most of my meals on Sunday or Monday nights - and they carry me through the week. The less time it takes me to throw it together the better. I'd rather spend my time slaving in the kitchen baking rather than cooking - but that's just my gig.
  • Healthy. Yep. Gotta make sure that what were making is good for us too. Not to say, the occasional cheesy, buttery, carby recipe won't make an appearance.
  • Ingredients are easily kept on hand. A lot of my recipes include ingredients that I can keep in my cabinets. Or freezer. So that when I figure out my week's agenda, I can just pull them out and start cooking.
  • Delayable. The single lady's social calendar can be a bit of a wildcard. Things change a lot. I may think when I'm shopping on Saturday that I will be eating 4 or 5 dinners at home, and by the time Sunday night rolls around its looking like only one or two, sometimes none. Usually, I'll freeze any meat, store the other ingredients, and just pull it out the next week (see above!).
  • Reheatable. Most of the meals I make are for multiple servings. I usually try to cook in terms of four. I find that a lot of recipes serve four, and usually, at the most, I'll be home for dinner 4 nights in a week.  I need my meals to be just as good Thursday night as they were Monday night.
  • Decent Serving Size. Like I said in the bullet above, I need something that will make for several meals, but also won't be so big that it feeds an army - and goes to waste. 
Okay, well that covers the criteria - let's get to the good stuff. The food.

The Single Lady's Meatloaf

(It's okay if at this point you start doing the one hip bounce and singing All the Single Ladies All the Single Ladies - Make Beyonce Proud)

Anyway...moving on.

Ingredients:
1lb +/- of Ground Turkey - I have been getting the leanest kind I can find. Ground Turkey Breast. You can absolutely use ground beef, or regular ground turkey. Whatever floats your boat.
1/2 cup Bread Crumbs
2 Egg Whites
1/3 cup Ketchup (or BBQ sauce!)
1/4 to 1 Whole Onion, chopped.
Salt, Pepper, Garlic Powder, Paprika, Cayenne Pepper, and Worcestershire Sauce - any or all of these - however much you like, to taste.
More Ketchup (or BBQ sauce!)

First up - preheat. I put my oven to 350* or 375* (obviously I don't have this down to a science). 

Spray a standard sized loaf pan very well. If you are feeling extra sassy - you could use a couple mini loaf pans. 

Combine all your ingredients. Yep that is it. Here are a few of my notes.

I looooooooove onions. A lot. And since this is the Single Lady meatloaf, if you like them too, go to town. Nobody will mind. I usually use about 1/2-3/4 of an onion. And save the rest for something else. Or just throw it away. If you don't like onions, feel free to skip them. 

You can totally get creative here - put anything you want in your meatloaf. Celery? Carrots? I almost put black olives in it tonight...would that be weird? You could also caramelize or sautee your onions before adding to the meatloaf. But like I said, I'm going for easy here.

Mix well.


At this point. You are basically done. I only started making meatloaf last month. Why did I wait so long?!? 

Now comes the fun part. Pack your meat mixture into the loaf pan. and flatten it down with a spoon. You know what else I love about this method? I don't have to actually TOUCH the meat. Bonus points there.

Squiggle ketchup along the top. You could leave it like that....or using a silicone brush spread the ketchup like a glaze over the entire meatloaf. (I should also mention at this point, you could sub in BBQ sauce for ketchup in the mixture and on top - I am meaning to try this soon - I think it sounds DEEE-LICIOUS!).


Stick it in the oven. Set the timer for 45 minutes to an hour. And walk away.

This is another reason I love this recipe. It gives me 45 minutes to do stuff I need to get done. Unload the dishwasher. Open the mail. Fold laundry. You name it. 

A well balanced single lady would probably cook up some veggies at this point. Unfortunately, I did not plan well, and forgot to pick up some this week. Asparagus would be SO good. Cauliflower and Broccoli as well. Especially anything that can be reheated with the meatloaf.

After the timer goes off - your meal should be ready. Let it sit in the pan for about 10 minutes - and take a knife to loosen the edges. Flip the meatloaf onto a plate or piece of foil. Let cool a little longer, slice, serve the piece you are going to eat tonight, and put the other slices into containers for reheating. (You can also freeze one of these containers for a fully cooked reheatable meal).

I served this up with a bowl of TJ's Low Sodium Minestrone Soup (veggies!). 


So there isn't anything too special about this meatloaf. Except that it's called the Single Lady's Meatloaf (which makes it pretty darn special). But it's just a regular old meatloaf. I think you'll still enjoy it. Single, or otherwise.


Tuesday, February 15, 2011

Cherry Lovie Cakes: What Not to do with Swiss Meringue Buttercream Frosting


Well, I had this really fun post started in my head....

I took pictures like this, so I could tell you about my pink kitchen, and pink kitchen supplies. Of course, I have the pink kitchen aid - you have probably seen it already:

I was going to tell you about my awesome black and white apron with pink apron strings and a ruffle on the bottom - a fabulous birthday gift from Betsy. I was kinda hoping you'd be jealous, are you?


I thought you might be.


I had been looking at THIS RECIPE for almost a month. In honor of Valentine's day. And I'd rename them something cute.

Cherry Lovie Cakes


I plotted, and planned. And schemed. Figuring out how and what I was going to do.  I decided I'd stray from the recipe a bit, and make all cherry cupcakes. Same ganache, and same frosting.

I went shopping and picked up the stuff I normally don't have on hand, such as Maraschino Cherries (note to self: keep on hand more often - YUM), Cherry Preserves, Heavy Cream, etc.

I gathered my gear - and set up all my cutie pie ingredients for a fabulous photoshoot (that Morton Girl is quite photogenic, isn't she?)


At this point, I realized I was going to be short on unsalted butter for the cake, frosting, AND chocolate ganache. I should have probably just quit when I was ahead. Before my kitchen became a disaster of Pinkalicious proportions.

Anyway, I decided to just make do with what I had. Salted or Un. 

So I mixed. And I whipped. And I whisked. I separated. And I chopped. I drained. And I diced. I measured. I poured.

I had a lot of bowls going. Everything looking bright and colorful. 
  

Things were going well.


I even had cupcake liners. I used my cookies scoop again, and things didn't get too messy.  


Cupcakes were in the oven. I was excited. And as I shut the oven door, and reached for the timer. It dawned on me, that I forgot two key ingredients.

Vanilla.

and more importantly
ALMOND EXTRACT.


I love almond extract. I wish I could pump it intravenously through my veins.  Cherry + Almond = Heaven. I was so sad. But, there was no time to be sad. Ganache had to be made. And Swiss Meringue Buttercream had to be created.  The adventure had just begun. I poured a little bit in the remaining batter (that made the last 8 cupcakes) and moved on.

Next up - CHOCOLATE:


By the time I was done with the ganache, cupcakes were cooling. And it was time to move on to the part I was looking forward to the most - Swiss Meringue Cherry Buttercream Frosting. 
And this is basically where the photography story ends. I whipped up my egg whites. Pasteurized them even! Waited for stiff peaks. Changed mixer attachments. I followed the instructions. But the buttercream was not holding up well. It was runny. And oozy. 

I didn't get discouraged - I guessed that maybe I had taken the eggs to "The Point of No Return" - you know? That point where you OVER beat them, and they go from fluffy stiff peaks to their liquid starting point? 

Take two. Whipped. Mixed. Pasteurized. White and shiny stiff peaks. Beautiful. I added the butter. Then the cherry preserves. Food coloring. And I was back at square one. Runny, oozy frosting. So, disappointing.

I decided that in an effort to salvage the Valentine's day treat, I would refrigerate the frosting and see if it would firm up, even enough to spread on the cupcakes without it running off the sides. 

Meanwhile, using the "cone method" I filled each cupcake with Chocolate Cherry Ganache. It actually worked really well! But I forgot to take pictures - boo!

Four hours of baking later, and a few more hours to chill, the frosting had firmed up just a bit, and so I frosted the cupcakes the best I could. 
They didn't turn out as glamorous as I had hoped - but not every cupcake can be glam.

Still, they were quite photogenic. <3


And, despite the Frosting Fail - I think they were a Tastebud Win:


Thanks to Jessica for being my cupcake model!


Definitely had to join the pity party this week with this recipe, especially since I had a real pity party when the frosting flopped twice!


Thirty Hand Made Days

Friday, February 11, 2011

The P-Dubb Club!

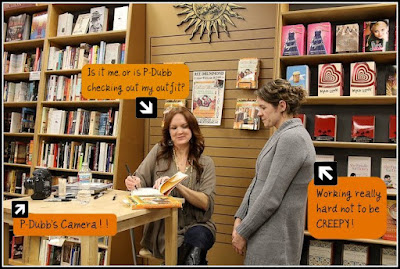
On Tuesday, I went out on a limb and responded to a Facebook invite to join the very talented Candace of Prokopets Studio* - who happened to shoot my sister's wedding with her adorable husband Vitaliy - to meet Blogging Royalty, Ree Drummond, the Pioneer Woman at the book signing of her first novel, The Pioneer Woman: Black Heels to Tractor Wheels--A Love Story

I have met Candace once - it was on the wedding day - where she was the most incredible photographer that I could have asked for for my baby sister. She took care of my sister that day, in ways that I had hoped to do, but wasn't able to, because I was dealing with a gallbladder-gone-rogue and was just doing my best to make it through the day without collapsing, or turning a deeper color of goldenrod.  She made sure Laura looked beautiful in each picture, she kept everything organized and the day running smoothly.

I knew I would have fun meeting P-Dubb, no matter who I was with, but I was excited that Candace didn't think it was creepy that I accepted her open invitation. (this was a very good start)! She organized the logistics, and we met up with her friend Trisha and headed into San Francisco to grab some grubb, and hang with P-Dubb.

The drive up went smoothly, and quickly, as the three of us talked non-stop about all of the Pioneer Woman trivia we could think of! Charlie, Cowboy Josh, Butter, and her brother Mike were just a few of our favorite topics.

We found street parking directly in front of Chevy's, which was directly across the street from Books, Inc., and enjoyed a very affordable Happy Hour dinner! Candace is a Chevy's connoisseur and gave us the best tips on what to order, and also noticed the funky vinegar taste to the salsa. (Replacement was subsequently requested!).

We eyed the other tables with large groups of ladies, donning sweaters with ruffles, DSLR's with ruffles, and ruffles with ruffles, knowing that we were in Pioneer Woman territory! Once we were finished we headed over to find out how we were going to make Ree become our BFF and score an invitation to the lodge (and maybe a date with Cowboy Josh).

There, we met up with another of Candace and Trisha's friends, Claire. She had figured out what we needed to do - get a ticket for the meet & greet group - we were letter I. Claire had H. When you think of the 26 letter alphabet it doesn't sound so bad, but when you look at a room of a couple hundred women, you realize you wish you had thought to check in at the bookstore BEFORE dinner (lesson learned).


Candace ended up doing a quick recon mission, and scored us seats along the wall at the very front. As in, directly to the right of where the Pioneer Woman would be speaking. This was definitely not a problem for any of us.  We met a few nice people while waiting for Ree to arrive. And I (as non-creepily as possible, but yet, probably still creepily) introduced myself to Mel of The Larson Lingo. And a few moments later the Pioneer Woman herself, with her absolutely adorable entourage of her two daughters, sister-in-law, niece, and mother-in-law (yes Marlboro Man's mama!), arrived!


She was as tall as she describes herself to be - and on top of that was rocking some serious 3 inch heels! All of the ladies looked absolutely gorgeous, and Ree and her team entertained the crowd with some Q&A for almost an hour. Ree was gracious and kind, answered each question honestly, and openly - including a few "insider secrets" about the potential movie, Reese Witherspoon, and what her life is like behind the scenes.


After the Q&A, P-Dubb was in it for the long haul. She autographed her little heart out, she complimented each and every person that came up to her table, she took multiple pictures with them as well. I know this because (like a total non-creeper, right?) I sat there directly in front of her for two plus hours until group H was called. (With the exception of a quick walk around the store, where I as non-creepily as possible introduced myself to Keri of Forever Folding Laundry).

Claire & Candace had to take off, so that left me and my brand new friend Trisha holding out for BFF-dom with Ree. We ended up talking to Ree's sweet daughter Petunia Paige about her adorable outfit (seriously Paige, where did you get that belt?), and life on a book tour.


And then, finally, it was my time at the table with Ree, where I kept repeating to myself "do not say anything weird, do not say anything weird" (I also received a few encouragement texts throughout the day to the same effect. Apparently, there was an incident with John Piper, where in an awkward silence I may have mentioned seeing some cute videos of his grandkids on YouTube - totally NOT creepy right?)
Ree, my new BFF, signed my cookbook (The Pioneer Woman Cooks: Recipes from an Accidental Country Girl


And graciously smiled for a glamor shot photograph with me.


And again with me & Trisha! (Two new friends in one adorable photo)


Moral of the Story: When you are BFF's with P-Dubb, like we obviously are, you can hang out in the creeper VIP section. She will even chat you up between fans, wave to you, and ask you to make sure her back isn't too sweaty. I mean, that's what friends are for, right?


I guess our invite to the lodge is in the mail?


*Yes that is my beautiful sister in the very first photo that comes up on their site!